


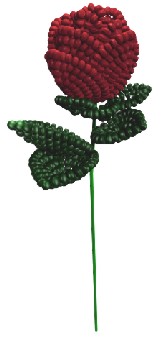
Free Craft Project
Bead Roses
 This project was submitted by Rings & Things. According to Dave - from their marketing department - it's one of their all-time favorites and we're betting it's sure to be one of yours as well. :)
Materials
- seed beads (rose red and green)
- artistic wire - 26 gauge
- cloth wrapped wire
- green floral tape
Instructions
Small Leaves
Cut 4 pieces of green wire (4 leaves), each approximately 6 inches long. Using needle-nose pliers, make a small loop at one end of each wire.
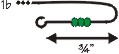 String 3 green beads on one of the wires. This will be the "base" row. Measure 3/4" over from the loop and bend the wire back over itself.
![]() With the beads between the end loop and the bend, twist the wire as shown in 1c. One wrap should be enough.
With the beads between the end loop and the bend, twist the wire as shown in 1c. One wrap should be enough.
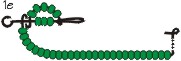
![]() String the remainder of the beads for this leaf (approx. 29 more). Make another loop or bend on the end so the beads can't fall off.
String the remainder of the beads for this leaf (approx. 29 more). Make another loop or bend on the end so the beads can't fall off.
 Push approx. 6 beads up to the twist of step 1c. (enough beads to fit snugly up against the "base" beads). Pull up close to the 3 "base" beads and bend wire around the outside of them to the opposite end and twist once. Be sure to go over the top of the "base" wire when twisting. Going over the top every time will make a front and back to the leaves. The back will have all the loops on it.
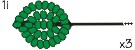
Continue around until there are 5 rows across. Be sure to pull beads tight, keeping rows side by side as much as possible to hide wire. (The example in 1f-g is exaggerated for illustration purposes... try to keep your wires closer together.)

After 5 rows, working wire should be at the bottom (away from the loop in step 1a). Twist wire around the "base" a couple times and pull off any extra beads.
 Turn the leaf over, so the back is toward you. Bend the top loop (1a) flat toward the center of the leaf. Do the same thing with the looped wire on the opposite end. (This helps hold the final twists of 1f-g in place.) Leave the remaining working wire straight down the bottom to make the stem.
 At the top of the piece (the end with the loop from step 1a), gently pinch the beads to form a slight point.
Repeat steps 1b-1i to form the 3 remaining leaves and set aside.
Larger Leaves
It's more realistic if you have different size leaves on your rose. To make larger leaves repeat the exact same steps as above but with the following adjustments...
NOTE: Figures outside parenthesis are for medium size leaves. Figures inside parenthesis are for large leaves.
Start with 7" (9") wire. Instead of 3/4" inch between loop and bend, make it 1" (1"). String 4 (6) starter beads instead of three. Create 4 (6) additional rows of beads around the starter row.
Rose Petals - Inner
![]() Cut 2 pieces of wire (red if you have it), both 10" long. Just like the leaves, make a loop at one end of each and create the "base" wire, stringing 4 rose colored beads and measuring 1".
Cut 2 pieces of wire (red if you have it), both 10" long. Just like the leaves, make a loop at one end of each and create the "base" wire, stringing 4 rose colored beads and measuring 1".
Using red beads, follow the same procedure for making a medium size leaf (6 additional rows around the 4-bead base row).
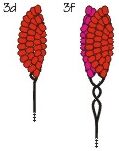
After completing the petal, gently cup it, with the back of the petal on the inside of the "cup" (the back is the side with all the loops). The petal should now be kind of like an oval fruit bowl ( 3d ).
 NOTE: Do NOT pinch petals to a point like you did with the leaves. Petals should be more rounded at the end.
Repeat the process using the second 10" wire (gives you 2 inner petals).
Now take both center petals and face them so they are cupping one another, then gently twist their stem wires together ( 3f ).
Rose Petals - Outer
Make a total of 5 outer rose petals...
3 Small Petals:
- Cut 3 pieces of colored wire 12" long.
- Place 4 beads on a 1" long "base" wire.
- Make 8 rows around the 4-bead base row.
2 Medium Petals:
- Cut 2 pieces of colored wire 13" long.
- Place 6 beads on a 1" long "base" wire.
- Make 8 rows around the 4-bead base row.
Gently curve the 3 small petals so they fit around the center petals. The curve will not be as tight as the center petals. Also, be sure the back of the petals face out, away from the center petals.
Now bend down the very top of the petal, to give the look of the rose opening. Be careful not to lose the shape of the curve.
Gently twist the 3 additional stems to that of the center petals.
Repeat the process with the 2 medium size petals.
Shape the rose to the desired finished look. Open wider for a more mature rose. For a rose bud, squeeze tightly shut.
Add the 3 small leaves by wrapping the wire of each leaf around the rose stem. Be sure to spread them out so they cover as much of the exposed wire from the petals as possible.
 To create the complete rose stem, insert a 5" long piece of Cloth Wrapped Wire into the middle of all the twisted petal wires. Wrap those wires around it to secure. (Anything much longer than 5" may cause the flower to droop due to the weight of the rose.)
Attach the leaves to one another by twisting together and then wrap with floral tape. Although you want to hide the "raw" wires, the less tape you use the better it will look.
Position the leaves on the long stem of the rose. Using the floral tape, wrap all the stems on the entire flower to hide the wires and help secure the flower to the 5" long stem. You can wrap just part way, or the whole 5" stem can be wrapped. Shape as desired.
Options
- Using a stick pin with a head, wire the stems of the flower and the 3 small leaves to the pin. Wrap up close to the head of the stick pin and cover with Floral Tape. Do not wrap wire too far down the pin because it should not interfere with a person's clothing.
- Make a Hat Pin, using the stick pin instructions.
- Try color variations of beads on the tips of the Rose petals to give a 2 tone look.
- Add more petals to open up a more mature Rose. Nine petals works well for this.