


Free Craft Project
4 Strand Braided Lanyard
If you've ever had trouble creating a 4-strand braided lanyard, worry no more. These instructions will guide you through each one of the steps. You'll be an expert braider in no time!
Materials:
- 6 yards of 1/8" flat plastic lace (or leather)
- swivel clip
Instructions:
1. Hang or tie the swivel snap on a nail of any firm object at a convenient working height. Adjust lace so snap is in exact center and all four ends are together.
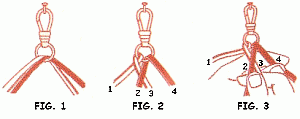
2. Arrange the strands as shown in Fig. 2, and count from left to right numbering them from 1 to 4.
3. Hold the center strands, 2 and 3, with the forefinger and thumb of the right hand. Take strand 4 with the left hand (Fig. 3) and bring around the back to the left and forward to the front between strands 1 and 2 (Fig. 4). Fold over strand 2 so that it lies parallel to strand 3 (Fig. 5). Draw all strands tight.
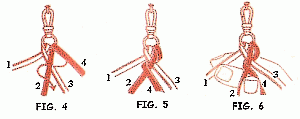
4. Hold the center strands, 2 and 4, with the forefinger and thumb of the left hand. Take strand 1 with the right hand (Fig. 6) and bring around the back to the right and forward to the front between strands 3 and 4 (Fig. 7). Fold over strand 4 so that it lies parallel to strand 2 (Fig. 8). Draw all strands tight.
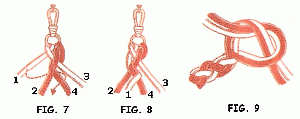
5. Continue braiding, repeating steps 3 and 4 alternately (Figs. 3 to 8). Remember that the working strand (the one that is woven into the others is always the uppermost outside strand either on the right or left.
6. Continue the round braid until the strands are 9 inches long. End with an overhand knot. Hold the lanyard in the left hand and tie the two left strands over the two right strands (Fig. 9). Be sure the strands are flat and neat before tightening the knot (Fig. 10).
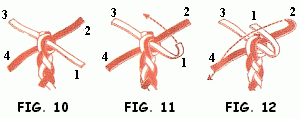
7. At this point you switch to the square braid. Hold the lanyard in the left hand, upside down so that the strands fall apart and re-number them from 1 to 4 (Fig. 10).
8. Fold strand 1 over strand 2, leaving a small loop (Fig. 11). Hold in position with the forefinger of the left hand. Hold each succeeding strand in position in the same way after each step.
9. Fold strand 2 over strand 1 (Fig. 12).
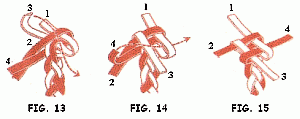
10. Fold strand 3 over strand 2 (Fig. 13).
11. Fold strand 4 over strand 3 and through the loop formed at the beginning (Fig. 14). Leave the stitch slightly loose (Fig. 15).
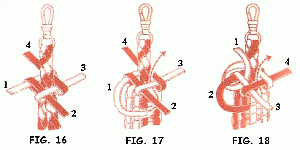
12. Form the loop of the lanyard by passing swivel snap through the center of the square braid just formed (Fig. 16). Tighten the braid slightly.
13. Slide the square braid along the lanyard every few stitches to be certain that it is not too tight. Keep it uniform and neat.
14. Continue the square braid, using the lanyard as a core, until the strands are 4 inches long. Re-number the strands after each stitch and then follow steps 9 to 12 (Figs. 11 to 15).
15. At this point you switch to the Terminal Turk's Head. In order to form a Terminal Turk's Head, leave the last stitch of the square braid slightly loose. Re-number the strands from 1 to 4 as shown in Fig. 16.
16. Hold the braid in the left hand. Bring strand 1 under strand 2 and up through the center (Fig. 17). Leave this strand slightly loose. All of the strands of the Terminal Turk's Head are to be tightened when the ending is complete.
17. Bring strand 2 under strand 3 and up through the center (Fig. 18).
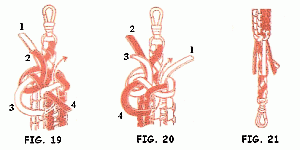
18. Bring strand 3 under strand 4 and up through the center (Fig. 19).
19. Bring strand 4 under strands 1 and 2 and up through the center (Fig. 20).
20. Tighten the strands one at a time, starting with strand 1. Tighten sufficiently to form a neat Terminal Turk's Head but loose enough to slide over the lanyard easily. Be certain that none of the strands are twisted. Then clip off the ends of the strands leaving a tassel of about 1 inch (Fig. 21)