


Free Craft Project
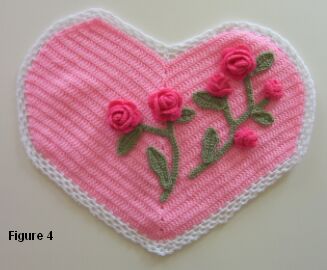
Crochet Sweetheart Pillow
This crochet sweetheart pillow isn't something you'll make quickly. But it's definitely something you'll treasure once you've completed the project.

Size: 24" x 17"
Materials
- yarn (2 skeins light pink, 1/2 skein dark pink, 1/4 skein white, 1/4 skein light green)
- crochet hook, size E/4
- yarn needle (or large-eyed sewing needle)
- 1/2 yard white fabric
- polyester fiberfill - 20 oz.
The Crochet Cover
Side A
Ch 97 with light pink.
Row 1: Dc in 4th ch from hook, 2 dc in next ch; dc in next 44 ch, skip next 2 ch, dc in next 44 ch; 2 dc in each of next 2 ch; ch 1, turn (48 dc on each side of ch-2 space).
Row 2: 2 sc in 1st dc, 2 sc in next dc; sc in next 45 dc, sk next 2 dc, sc in next 45 dc; 2 sc in each of next 2 dc; ch 3, turn (49 sc on each side).
Row 3: Dc in 1st sc (turning ch-3 counts as 1st dc); dc in next 47 sc, skip 2 sc, dc in next 47 sc; 2 dc in last sc; ch 1, turn (49 dc on each side).
Row 4: 2 sc in 1st dc, sc in next 47 dc; skip 2 dc, sc in next 47 dc, 2 sc in last dc; ch 3, turn (49 dc on each side).
Rows 5, 7, 9, 11: Repeat Row 3.
Rows 6, 8, 10, 12: Repeat Row 4.
Row 13: Skip 1st sc (turning ch-3 counts as 1st dc), dc in next 47 sc; skip next 2 sc, dc in next 48 sc; ch 1, turn (48 dc on each side).
Row 14: Sc in 1st dc, sc in next 46 dc; skip next 2 dc, sc in next 47 dc; ch 3, turn (47 sc on each side).
Rows 15, 17, 19, 21: Repeat Row 13 (46, 44, 42, 40 dc on each side).
Rows 16, 18, 20, 22: Repeat Row 14 (45, 43, 41, 39 sc on each side).
Row 23: Decrease with dc in next 2 sc (turning ch-3 counts as 1st dc); dc in next 35 sc, skip next 2 sc; dc in next 35 sc, decrease with dc in next 2 sc, dc in last sc; ch 1, turn (37 dc on each side).
Row 24: Sc in 1st dc, decrease with sc in next 2 dc, sc in next 33 dc; skip next 2 dc, sc in next 33 dc, decrease with c in next 2 dc, sc in last dc; ch 3, turn (35 sc on each side).
Rows 25, 27, 29: Repeat Row 23 (33, 29, 25 dc on each side).
Rows 26, 28: Repeat Row 24 (31, 27 sc on each side).
Row 30: Repeat Row 24. Do not ch 3 and turn (23 sc on each side).
Attach white yarn.
Round 1: Ch 1, turn, sc in 1st sc, (ch 3, skp 2 sc, sc in next sc) 7 times; skip next 2 sc, sc in next sc; (ch 3 skip 2 sc, sc in next sc) 7 times; ch 3, turn corner, sc in side of 1st sc; (ch 3 skp next dc, sc in side of next sc) 14 times; ch 3, sc in bottom side of next dc, ch 3, turn corner, sc in bottom of 1st dc; (ch 3 skip 2 dc, sc in bottom of next dc) 15 times; ch 3, sc in ch-2 space, ch 3, sc in bottom of next dc; (ch 3, skip 2 dc, sc in bottom of next dc) 15 times; ch 3, turn corner, sc in bottom side of same dc; ch 3, sc in side of next sc; (ch 3, sk next dc, sc in side of next dc) 17 times; ch 3, sl st in 1st sc to join (80 ch-3 spaces).
Round 2: Sl st in next ch-3 space, ch 1, sc in same sp; (ch 3, sc in next ch-3 space) 6 times, sc in next ch-3 space; (ch 3, sc in next ch-3 sp) 38 times; ch 3, in next ch-3 space work (sc, ch 3, sc); (ch 3, sc in next ch-3 sp) 33 times; ch 3, sl st in 1st sc to join (80 ch-3 spaces).
Round 3: Sl st in next ch-3 sp, ch 1, sc in same space; (ch 3, sc in next ch-3 space) 5 times; sc in next ch-3 space; *(ch 3, sc in next ch-3 space); repeat from * around; ch 3, Sl st in 1st sc to join (79 ch-3 spaces).
Round 4: Sl st in next ch-3 space; ch 1, sc in same space; (ch 3, sc in next ch-3 space) 4 times; sc in next ch-3 space; (ch 3, sc in next ch-3 space) 6 times; * ch 3, in next ch-3 space work (sc, ch 3, sc); (ch 3, sc in next ch-3 space) 6 times; ch 3, in next ch-3 space work (sc, ch 3, sc); (ch 3, sc in next ch-3 space) 5 times; ch 3, in next ch-3 space work (sc, ch 3, sc) *; (ch 3, sc in next ch-3 space) 38 times; repeat from * to *; ch 3, sc in next ch-3 space; ch 3, sl st in 1st sc to join (84 ch-3 spaces).
Round 5: Sl st in next ch-3 space, ch 1, sc in same sp; (ch 3, sc in next ch-3 space) 3 times; sc in next ch-3 space; * ch 3, sc in next ch-3 space; repeat from * around; ch 3, sl st in 1st sc to join (83 ch-3 spaces).
Fasten off and blind weave end into back of stitches.
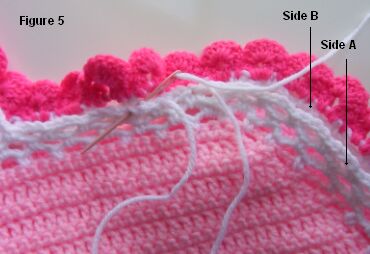
Side B with Edging
Duplicate Side A. Attach dark pink.
Ch 1. Sc in sc (starting sc from Row 30). sl st into first ch 3 space. Ch 3 (counts as 1st dc). Dc, ch 2, 2 dc in same space. *Sc in next sc; 2 dc, ch 2, 2 dc in next ch-3 space. Repeat from * all the way around.
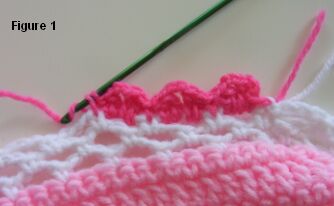
Ch 1. Sc in sc (starting sc from previous round). sl st in top of 1st and 2nd dc. sl st into first ch-2 space. Ch 3, 6 dc in same space. *Sc in next sc. 7 dc in next ch-2 space. Repeat from * all the way around.
Sc in starting sc. sl st in top of ch 3 (1st dc).
Fasten off and blind weave end into back of stitches.
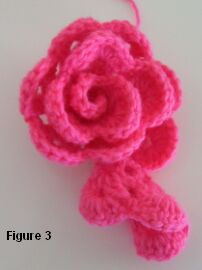
Roses
Ch 41, leaving a 10-12" tail of yarn.
Row 1: Dc in 4th ch from hook. Ch 3, 2 dc in same space. * Ch 1, skip 2 dc. In next ch (dc, ch 2, dc). Repeat from * to the end. Ch 1, turn.
Row 2: Sl st in first ch-2 space. Ch 3 (counts as 1st dc). 6 dc in same space. * Sc in ch-1 space. 7 dc in next ch-2 space. Repeat from * to the end.
Fasten off and blind weave end into back of stitches.
To shape the rose...
Thread tail of yarn into a yarn needle. Starting at tail end of starting chain, begin rolling the crochet piece (right side in). As you create wraps, gently stitch them together with tail of yarn to form and retain the shape of a rose.
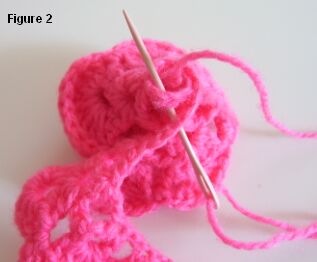
Be careful not to roll/wrap the piece too tightly or loosely. Just enough to form the type of rose you want.
For larger roses simply add more starting chains in multiples of 3 (44, 47, 50, 53).
Rosebuds
Small Closed: Ch 12, duplicate rose instructions above.
Medium Closed: Ch 15, duplicate rose instructions above.
Opening Rosebud: Ch 21, duplicate rose instructions above.
Stems
Short Stem - Ch 40. Sc in 2nd ch from hook. Sc in next 15. Ch 9. Sc in 2nd ch from hook. Sc in next 6 ch. 3 dc in next sc. Sc in each of the remaining chains of the original ch 40, with sl st in final (1st) chain. Fasten off and blind weave the end into front of stitches (stems will be sewn on pillow wrong side facing out).
Long Stem - Ch 40. Sc in 2nd ch from hook. Sc in next 15 ch. Ch 27. Sc in 2nd chain from hook. Sc in next 17. Ch 9. Sc in 2nd ch from hook. Sc in next 6 ch. 3 sc in next sc. Sc in each of the remaining chains of the original ch 40, with sl st in final (1st) chain. Fasten off and blind weave the end into front of stiches.
Leaves
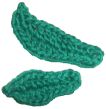
Small - Chain 9. Sc in 2nd ch from hook, hdc in next chain, dc in next chain, hdc in next 2 chains, sc in next 2 chains, 3 sc in last chain. Working on opposite side of starting chain, ch 1, sc in next 2 chains, hdc in next chain, dc in next chain, hdc in next chain, slip stich in last chain. Fasten off and blind weave end into back of stitches.
Medium - Chain 12. Sc in 2nd ch from hook, hdc in next 2 chains, dc in next 3 chains, hdc in next chain, sc in next 3 chains, 3 sc in last chain. Working on opposite side of starting chain, ch 1, sc in next 3 chains, hdc in next chain, dc in next 3 chains, hdc in next 2 chains, sc in next chain, slip stitch in last chain. Fasten off and blind weave end into back of stitches.
Large - Chain 16. Sc in 2nd ch from hook. Sc in next chain, hdc in next 2 chains, dc in next 4 chains, hdc in next 2 chains, sc in next 4 chains, 3 sc in last chain. Working on opposite side of starting chain, ch 1, sc in next 4 chains, hdc in next 2 chains, dc in next 4 chains, hdc in next 2 chains, sc in next chain, slip stitch in last chain. Fasten off and blind weave end into back of stitches.
Adding Flowers to Side A
Using the rose placement template as a guide, arrange and position stems, leaves, and flowers on Side A. Stitch all pieces firmly in place. NOTE: Stems should be placed wrong side out.
Joining Sides A and B
With wrong sides facing, put Side A and Side B together. Using yarn, stitch Side A to Side B.
Stop at 2/3 of the way around and then slip/stretch the joined cover over the pillow (instructions below). Stitch the last 1/3 of the opening closed.
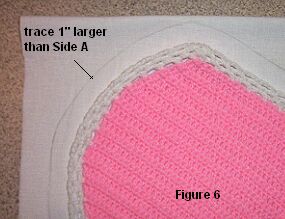
The Pillow
Take Side A and stretch it flat on top of doubled white fabric (wrong sides out). Trace around Side A, allowing 1" extra (so that the fabric is 1" larger than Side A).
Trim fabric along trace line.
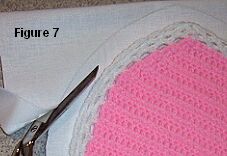
Allowing a 1/2" seam, sew the two pieces of white fabric together. Leave a 6" opening to insert fiberfill.
Snip curves, being careful not to cut the stitches (Figure 8).

Turn right side out. Stuff with fiberfill. Stitch 6" opening closed.