


Free Craft Project
Quilled Flower Picture
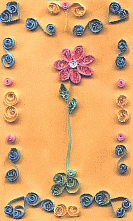
This quilled flower picture will definitely test your quilling skills and open up your creative side. But once you've completed it, you'll have a beautiful wall hanging that you can certainly be proud of!
Finished size: 3-1/2" x 6"
Materials
- Quilling tool
- Pins
- Quilling board
- Scissors
- Glue
- Paper: 5 strips of green, 7 strips of pink, 4 strips of yellow, 12 strips of blue, 1 strip of white (You can use whatever colors you have available or what would match your decore. These are just examples.)
- Background paper measuring 3-1/2" x 6" whatever color you like
- Cardboard 3-1/2" x 6"
Insructions
How To Make Basic Quilling Shapes
Flower
Make 6 loose pink scrolls and pinch into cat's eyes (marquise). These are your petals.
Make one tight white scroll with white paper. This is the center of the flower.
On quilling board, secure the while scroll by placing a straight pin through center. With glue and pins, put petals (pink scrolls) around the white scroll.
Allow to dry.
Stem
Take one green strip and make a tight scroll only half way down the strip. Allow to unravel slightly and glue on quilling board. If need be, use pins to hold the shape. You should have a loose scroll with a long, straight tail. This is the main stem of the flower.
Make the following using green strips:
2 leaf scrolls
1 tight scroll
1 S-scroll
Take your main stem, pinned in place on your board with the straight tail being the top of the stem. Apply leaves about half way down the stem with glue and pins to hold into place. Take S scroll and place with glue and pins at the bottom of the stem on a slight angle. Glue and pin the tight scroll at the "V" shape that is in between the stem's loose scroll and the top of the S scroll.
Allow to dry.
Border
Make 4 blue hearts, glued and pined for drying. Make 4 blue S-scrolls, make 2 more tight S-scrolls (glue if necessary to prevent from unraveling). Try and make each of the shapes equal in size for overall balance of the final picture.
Also, make 1 yellow V-scroll, 2 yellow S-scrolls, and one C-scroll. Make 1 tight pink scroll.
Applying Shapes to Background
It is always a good idea to arrange everything on your background before gluing so you can make adjustments in order to have a balanced project.
Place your flower bud with stem on the background so that the stem is about 1/2" from the bottom.
Place one blue heart in each corner of the background with the bottom of the heart pointing towards the middle of the background.
Place yellow V-scroll top center of the border, with pink tight scroll in the middle of the V-scroll.
Place one blue S-scroll in between the heart and the V, with S scroll on an angle towards the bottom of the yellow V-scroll. Repeat on the opposite top corner.
Place blue S, then yellow S, then blue S down each side of frame.
Place yellow C-scroll bottom center of the background (under stem) with a tight S-scroll on either side of it.
Now simply glue everything permanently in place.