


Free Craft Project
Matching Clay Bowls
These matching clay bowls makes for a fun craft project that the kids can be involved in. There's nothing they like better than being able to get their hands "dirty".
Materials
- clay
- ceramic or plastic bowl
- plastic food wrap
- waxed paper
- water based paint
Instructions:
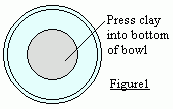
Line your ceramic or plastic bowl with plastic food wrap. Press some clay into the bowl, just enough to cover the bottom (approx. 1/4" to 1/2" thick).
Make several long "worms" of clay 1/2" in diameter (you can roll the clay between both your palms, or roll it back and forth on any flat surface).
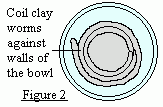 Take one of your clay worms and place it on the bottom clay, pushing it up against the sides of the plastic lined bowl as well. Now work the clay coil down against the bottom clay with your fingertips, making certain you've created a smooth tight bond between the two (no gaps).
Now start building the coils on top of this (and against the ceramic bowl) all the way to the top of the bowl.
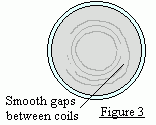 Work the clay until the gaps between the coils are completely blended together, creating a surface that is smooth and even throughout. (If the clay is too stiff, dip your fingertips in water as often as needed while blending the gaps between coils).
Carefully turn the ceramic bowl upside down on a sheet of waxed paper. Lift the bowl from off the clay and then peel away the plastic wrap.
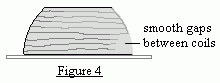 Blend all the outside gaps until the entire surface is smooth and even.
When that's done, gently turn the bowl right side up and smooth and shape the lip all the way around.
Optional:
You can make a 1/4" diameter clay worm, form it into a circle, and then attach it to the bottom (so that it sits just inside the outer edge of the bowl). Using your fingertips, smooth the gap all the way around where the coil circle meets the bottom of the bowl. Allow the bowl to dry right side up.
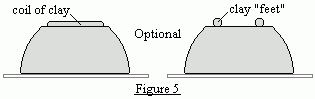
Or, you can add three or four small balls of clay (feet) to the bottom. To make certain they stay in place, create a small amount of "slip" (watered down clay). Use this the same way you would use glue. Allow the bowl to dry right side up.
Sign your name to the bottom in the wet clay (you can even add the date as well). Just use a blunt tip pencil or an old pen.
While the clay is still wet, you can place a decorative border around the outside upper edge of each bowl (you can find patterns under Templates in the members area - just print out whatever one you would like).
Position the printed design up against the bowl and then, using a pencil (make sure the lead tip is blunt, not pointed) trace it onto the clay. The more pressure you apply, the deeper the grooves in the pattern.
Once the bowl is completely dry, just color the design using either poster or acrylic paint.