


Free Craft Project
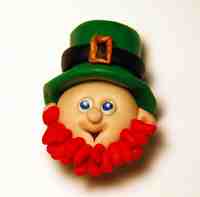
Clay Leprechaun Pin
Submitted by Karen Hunady from Crafts For All Seasons...
This polymer clay leprechaun is easier to make than you think! Polymer clay is one of my favorite mediums to work with. If you have never worked with it before, be sure to check out the tips and techniques: Polymer Clay page (a new window will open). These step by step directions will show you how easy it is to create this spirited little character.
Materials
- polymer clay (flesh or pink, red, green, black, white, blue or green for the eyes)
- pin backing
- garlic press (optional)
- Polymer clay sealing glaze
Instructions
1. To begin the polymer clay leprechaun, the first step is to condition all the clay. You will need a one inch ball amount of the green and flesh clay. The other colors you will not need very much of. Work that clay and warm it up in your hands, until it is not crumbly and is soft and pliable.
2. Next make the ball for the leprechaun's face by rolling the clay in your hands. How big it is depends on how big you want the pin to be. I made mine about the size of a nickel.
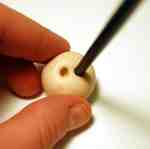
3. Next you want to poke some deep holes for the eye sockets. Within these holes we will be putting in tiny clay balls for the eyes. Find a tool to use, like a pencil tip, toothpick, a fingernail cuticle stick, or the back of a paintbrush to poke the holes.
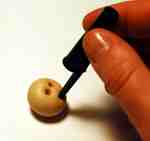
4. You can get creative with his mouth. Experiment with different tools. For mine, I used the pointed end clip of a pen. It make a triangular shape mouth I liked.
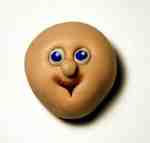
5. Make a small ball out of the flesh or pink for the nose, and place it below the eye sockets.
6. For the eyes, roll two tiny white balls, two tiny green or blue balls, slightly smaller than the white, and two more very tiny balls of white for the "sparkle" of the eyes. Assemble these together to make the eyes. Use a toothpick to pick up the small balls, this helps greatly. Then, place the eyes into the sockets. Presto! You have the eyes in!
7. Make two small ears out of the flesh or pink color by rolling two small balls. Then flatten each ball and cut one side flat, and place the flat side along the side of the face for each ear.
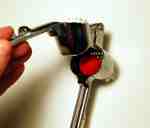
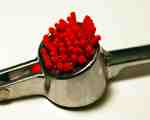
8. To make the polymer clay leprechaun beard, I used a garlic press. Once you use a kitchen tool for polymer clay it should never be used again for food. A clay gun also works well. If you don't have these tools, you can also make the hair by rolling a long thin red snake, and then cutting it in little pieces. This works just as well.
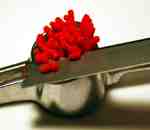
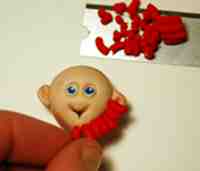
For the garlic press technique, roll a soft red ball of clay and place it in the garlic press. Push it through, then use a blade to cut off the little hairs. Place each hair on the leprechaun for the beard. A toothpick helps pick up and place each hair.
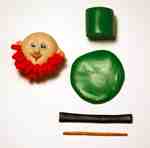
9. For the hat, make a green cylinder tube. Do this by rolling a ball in your halls, then just rolling it back and forth to make it become cylindrical. Next, you can slice off the top and bottom to make smooth cuts to get the cylinder. Next, make the brim of the hat by making a green flat circle. I started with a round ball and flattening it between my palms. You will also need a strip of black for the hat's stripe and a little rope of gold or orange for the buckle on the hat.
10. Place the brim over the leprechaun's head first, folding it to him. Remember the back of the pin should be as flat as possible so you can fold the brim of his hat flat against the back of his head. Then add the top of the hat. Add on the black strip around the hat. For the buckle, take the little gold rope and make a rectangle of out it, by pinching each corner slightly.
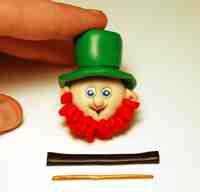
11. Once you have the leprechaun assembled, it is time to bake it. Follow your clay package instructions (usually 265 degrees F for 20-30 minutes). Place your leprechaun on white cardstock on a cookie sheet. Let your leprechaun cool completely before touching it.
12. If desired, brush a coat of polymer clay glaze on the leprechaun to protect it and give it sheen.
13. Once dry, hot glue or superglue the pin backing to the polymer clay leprechaun.