


Free Craft Project
Parrot Wind Chimes
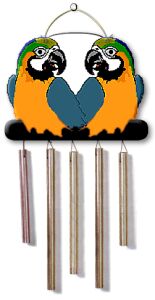
These parrot wind chimes are a terrific craft project. If you're into woodworking, you can make any theme you want. Animals, flowers, or even different types of birds. You can also change the sound simply by making the conduit chimes different lengths. Just have fun with it!
Size: 5-1/2" x 4-1/2" (parrots), 5-1/2" x 14-1/2" (overall)
Materials
- 8" long piece of 1 x 6 wood
- 38" of 1/2" conduit
- acrylic paints (see color template)
- thin nylon cord (enough to attach conduit and hang wind chime)
- 1" ring (for hanging wind chime - optional)
Tools
- jig saw or scroll saw
- hacksaw or tube cutter
- drill and small drill bit
- sandpaper
- small paint brush
[an error occurred while processing this directive]
Instructions
Using the template as a guide, trace the overall shape onto the 1 x 6.
Using either a jig or scroll saw, cut along the outside line of the pattern.
Drill all 7 of the holes (indicated by small yellow circles on the pattern).
Sand both sides of the piece. Sand and smooth the edges all the way around.
Trace the pattern details on both the front and back sides of the piece.
Following the color template, paint both sides of the piece.
Cut the conduit into five pieces (two 6" pieces, two 9" pieces, one 8" piece).
Drill a hole 3/4" from the end of each piece of conduit (drill all the way through from one side of the conduit to the other).
Assembly
When attaching the conduit pieces (the chimes), place them in the following order: 6", 9", 8", 9" 6".
Thread nylon cord through the hole in a conduit (chime) and the corresponding hole at the bottom of the wood piece. Allowing enough slack for the conduit to hang 1 inch below the wood, tie a knot and cut off excess cord. Repeat for the remaining pieces of conduit.
Cut a piece of nylon cord approximately 6 to 8 inches long. Tie the ends in each of the two holes at the top of the wood piece. (If you're using a hanging ring, slip the free end of the nylon cord through it before you secure the cord to the second hole.)