Free Craft Project
Special Occasion Photo Album
You can take any photo album and turn it into a work of art. Simply use this craft project as a guideline and then get creative with how you "dress up" your album!
Materials
- photo album
- 3 pieces of decorative fabric (amount depends on the size of album - see instructions)
- 2 pieces of cardboard (width and height should be 1/2" less than the size of the album cover)
- 1 piece of cardboard (see Instruction #5)
- piece of clear lightweight plactic (see Instruction #8)
- lace (a yard or two, depending on the album size)
- decorating accessories (ribbon, small flowers, etc.)
- glue and/or glue gun
Instructions
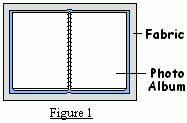
1. Place fabric on a flat surface, wrong side up. Place photo album (Figure 1 - opened and laying face down) on fabric. Trim fabric so there is at least 1" extra all the way around. Fold over top and bottom edges of fabric so that it's the same height as the album itself and tuck underneath (Figure 2).
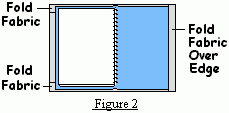
Starting at one side, fold the excess fabric over the edge of the photo album cover and glue in place (Figure 2). Do the same to the opposite side, making certain there is enough slack to allow the album to close comfortably.
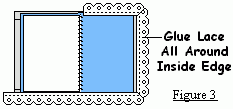
2. On the inside of the album, glue lace all the way around the edge (Figure 3 - you want the lace to stick up far enough to be seen when the album is closed).
3. Cover the two pieces of cardboard (which are 1/2" less than the width and height of the album cover) with fabric. Allow at least one inch of fabric to fold over the edges and glue in place.
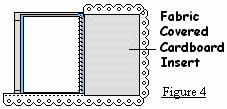
4. Now place glue on the inside cover of the album and then center the cardboard (Figure 4 - the edges of the lace should not be seen). Repeat with the opposite cover of the album.
5. Cut a piece of cardboard into a suitable size frame (depending on whatever picture, photo, or message you would like on the cover of the album). It can be any shape you want (rectangle, heart, etc.). Once you cut out the cardboard shape itself, cut the identical shape out of the center, allowing approx. 1" of actual frame.
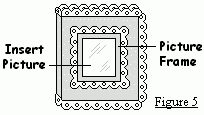
7. Attach the frame to the album cover, gluing only the very edges of the sides and bottom. (You need to leave the top open so you can insert a photo, etc.)<
8. Cut a piece of clear plastic which will slip snuggly and comfortably into the frame. Now just insert your cover object (photo, picture, etc.)
To spice it up, you can decorate with ribbon and bows, flowers, anything you like. For example, if it's a baby album, you might consider a small spoon or doll's baby bottle. If it's a vacation album, dress it up with fishing lures or bits of picture postcards. Use your imagination!


