Free Craft Project
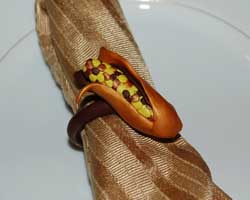
Polymer Clay Thanksgiving Napkin Ring
Submitted by Karen Hunady from Crafts For All Seasons...
These cute Thanksgiving napkin rings look like mini ears of Indian corn, and are made very easily using a few shades of polymer clay. They add a creative touch to the holiday table. This project is easy enough for an older child to help you construct them too!

Materials
- Quarter size ball of brown polymer clay
- Quarter size ball of yellow polymer clay
- Quarter size ball of bronze (or deep orange) polymer clay
- Polymer clay cutting blade (or exacto knife, or razor blade)
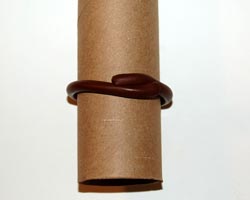
- Empty toilet paper roll
Instructions
1. Begin your Thanksgiving napkin rings by rolling a rope of brown clay, long enough to wrap around the empty toilet paper tube. Overlap the ends slightly as shown.
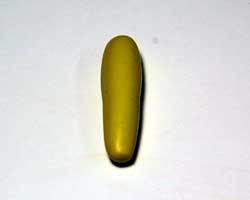
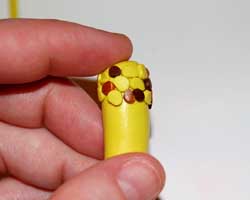
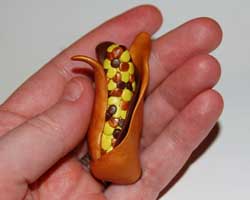
2. To make the ear of corn, roll a ball of yellow clay, slightly smaller than the diameter of a quarter. Then, roll this ball back and forth in your hands to flatten it into a cylinder. Roll the one end with slightly more pressure to make it slightly tapered at one end, like an ear of corn.
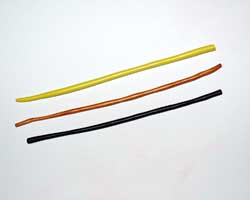
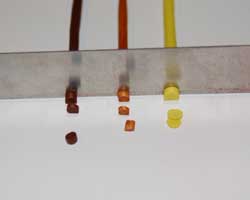
3. Next, roll three thin snakes of the three colors of polymer clay. Make them pretty thin, about 2 or 3 mm in diameter. Then use your polymer clay blade to slice off small chunks of clay. These will be the Indian corn kernels.
4. Start to apply the kernels to the ear of corn, in no particular color order. Add a lot more yellow kernels than the other two kernels. Keep sticking them on until the whole ear is covered in clay kernels.
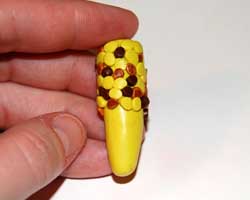
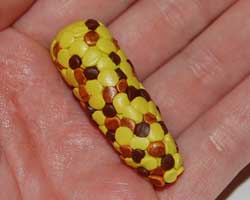
5. Lightly roll the ear of corn between the palms of your hands, to softly flatten down some of the kernels and make them adhere better.
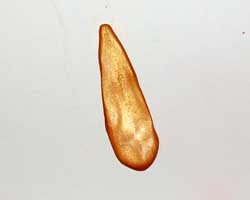
6. To make the corn husks, start with a ball of bronze and brown clay. Flatten the ball between the palms of your hands, then pinch together the top to make a flat tear drop shape.
7. Gently wrap these husks around the ear of corn. For mine, I used three husks, two bronze and one brown. Then, attach your ear of corn to the napkin ring and bake according to the manufacturer's instructions.
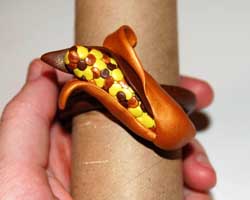
8. When the piece has cooled off, gently slide the napkin ring off of the toilet paper roll. You can spray the napkin ring with clear varnish for extra shine, if you desire.