Free Craft Project
Clay Rose Wreath Pin
Submitted by Karen Hunady from Crafts For All Seasons...
This rose wreath pin is made out of polymer clay. This is one of those crafts that looks very impressive but it really is very easy to do. The instructions below will walk you step by step on how to make the polymer clay roses. These pins make wonderful gifts. If you have never worked with polymer clay before, check out my tips and techniques page before beginning (a new window will open).

Materials
- polymer clay (red, pink, white)
- pin backing
- brayer or rolling tool (or you can use a pen)
- razor blade or other cutting tool
- Polymer clay sealing glaze, or clear fingernail polish
Instructions
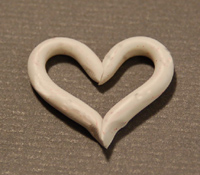
1. If you've never worked with polymer clay before, click here click here to be connected to my Tips and Techniques Page about polymer clay (a new window will open). Begin by conditioning your clay. Take the white clay and roll a long rope about 4 inches long. Cut it to size using the razor blade.
2. Form this rope into a heart. Pinch the clay with your fingers at the point and the cusp to make the bends.
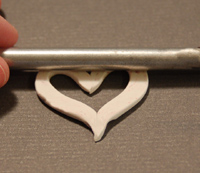
3. Flatten the heart very slightly with a roller. This is the base of your pin, where you will attach the roses.
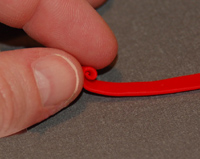
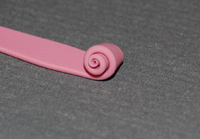
4. Begin with the red roses first. Roll a thin rope of red, then flatten the roll with your rolling tool. Cut the two ends clean across with a razor blade. Beginning at the one end, begin the roll the clay upon itself tightly, and keep rolling until you get to the end. If the rose is getting too large, stop at any point and cut the rest of the clay off. To make the rose look more realistic, slightly angle the clay as you roll it, so the outside layers are slightly higher (when you are looking at the front of rose) that the inside folds. When the rose is done, you can use your fingers to slightly flare out the outer petals.
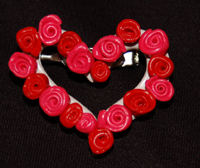
5. Place your rose on the heart clay base, pushing down ever so slightly. Don't push too hard or you'll squish your rose. Baking your piece will also help adhere the roses to the base.
6. Next, work with the 2.5 inch lengths of string. Use these to trace the loops that appear on each snowflake arm. Don't get too worried if you don't get them exactly placed well. The shape of the double loop is more important. When this is dry, you will have to glue them in place anyhow since the fabric stiffener is not strong enough to hold the bond.
class="center"

7. To make a lighter shade of red, combine an equal amount of white clay and red clay and blend well. Doing this ensures you have a color that matches the red well, instead of just purchasing pink polymer clay.
8. Use this pink clay to make several roses, and place them on the wreath in between the red roses.

9. When the rose pin is done, bake it according to the clay manufacturer's instructions.
10. When the rose is cooled off, brush the pin with a coat of polymer clay glaze, a spray of acrylic sealing coat, or use clear fingernail polish.
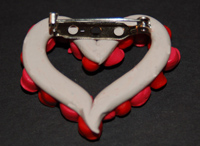
11. When the rose is dry, turn it over and glue the pin backing to it, using hot glue or super glue. Your rose wreath pin is now ready to wear for Valentine's Day!