Free Dog House Plans
Classic Style Dog House
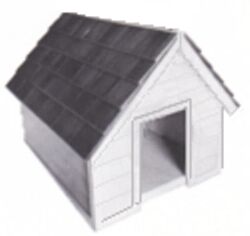
This is your basic dog house style but with some great touches that finish it off in a grand way. Like the 6" siding and the roof shingles.
It's easy to build but gives your dog a very solid and stylish place to chill out.
NOTE: For your convenience there is a link at the bottom of these instructions that you can use to open a print version page.
Materials
1/2" plywood
1 - 32" x 42"
2 - 19" x 42"
2 - 32" x 35"
2 - 26-1/4" x 48"
3 - 8' 2x2 (floor frame and wall cleats)
3 - 8' 2x2 (corner and base trim)
1 - 4' 2x2 (door opening trim)
4 - 30" 1x2 (front and back eave)
1 - 4' 2x4 (ridgepole)
1 - 12" 1/2" quarter round
4 - 30" 1/2" quarter round (to finish off roof edges)
2 - 50" 1/2" quarter round (to finish off roof edges)
18' 2x2
1 - 4' 1x1
4 - 24" 1 x 1-1/2"
17' 1/4"
33-1/3 sq. feet 6" cedar clapboard (siding)
roof felt (enough to cover the roof)
1 bundle cedar shingles
1 - 48" 2-1/2" metal flashing (roof ridge)
4d box nails
6d finishing nails (trim)
1" finishing nails (quarter round)
staple gun and 1/4" staples (to install roof felt)
exterior wood glue (optional)
exterior paint (trim)
Instructions
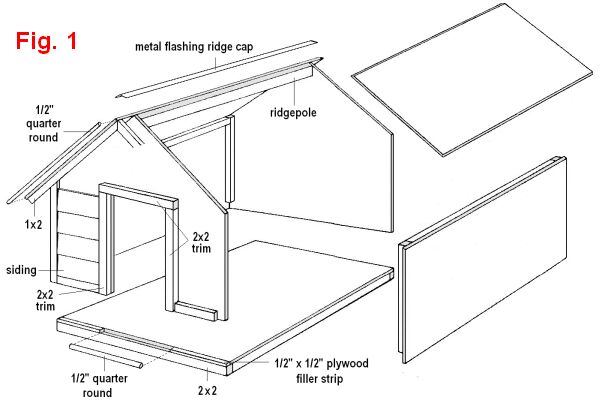
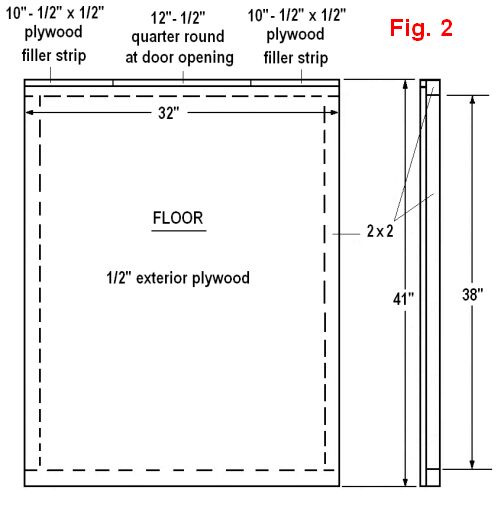
Referring to Fig. 2, cut the floor plywood and 2x2 frame. Assemble the floor making certain you allow a 1/2" gap at the front edge (see Fig. 1). Here you will place the 12"-long 1/2" quarter round at the door opening and each of the 10"-long 1/2" x 1/2" plywood pieces on either side.
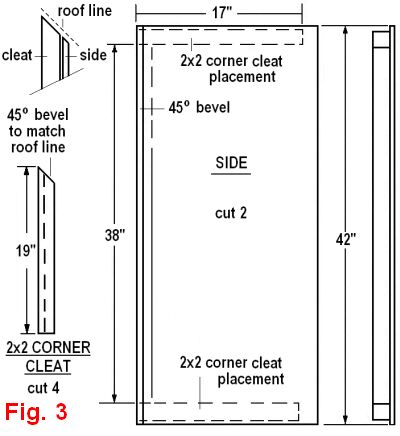
Referring to Fig. 3, cut and assemble the two sides. Note the 45 degree angle at the top edge of each plywood side and on one end of each of the 4 2x2 corner cleats. (This bevel matches the angle of the roof line).
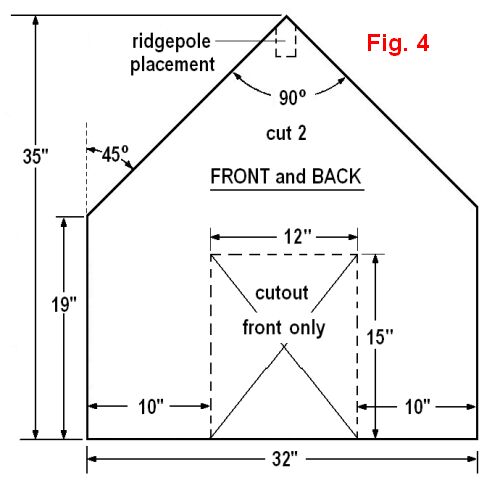
Referring to Fig. 4, cut the front and back pieces. (If necessary, adjust the size of the door opening larger or smaller to accommodate the size of your dog.)
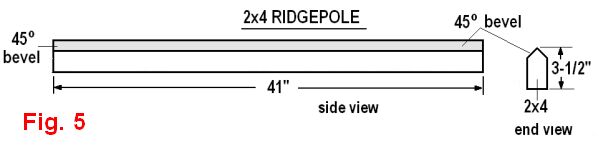
Next, cut and asemble the ridgepole (Fig. 5). Nail the sides, front, and back to the floor and to each other at the corners. Position the ridgepole and then nail from the outside through the plywood and into the ends of the ridgepole.
Install 2x2 trim around the door opening.
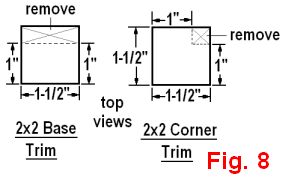
Referring to Fig. 8, create the corner and base trim. For the corner trim, you'll be removing just shy of 1/2" x 1/2" from each 2x2. This creates a "notch" that fits at each corner of the dog house.
For the base trim, you'll be removing just shy of a 1/2" all the way across one side of each 2x2. This leaves a piece of trim that measures 1" x 1-1/2" which will be placed around the base of the dog house (between the upright corner and door trim).
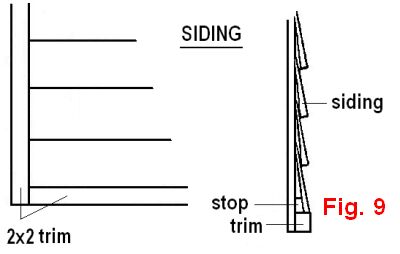
Starting at the bottom and working upward, install siding all the way around, overlapping 2 inches. (This leaves 4 inches of revealed siding on each row.)
NOTE: If any nails have gone through to the inside, you'll need to cut them off flush.
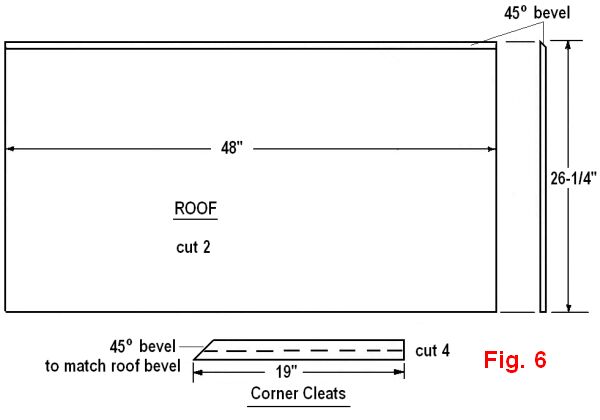
Referring to Fig. 6, cut the two roof pieces and the 45-degree bevel at the top edge of each one. Nail the roof in place.
Once the roof is installed, cut and attach the 1x2 eave trim at the front and back. Using 1" finish nails, attach the 1/2" quarter round all along and covering the bare edges of the plywood.
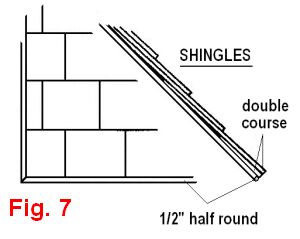
Cover the roof with felt and then install the shingles, beginning with the bottom edge and working toward the top. Bend and install the metal flashing evenly along the ridge (roof cap).
Paint the trim.