Free Dog House Plans
Western Style Dog House
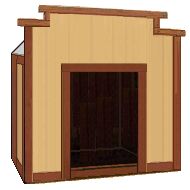
Western style buildings are extremely popular. And what better way to take advantage of this design than to build a unique looking
house for your dog. It's a little more involved than the classic style dog house, but the result is well worth the extra time and effort.
NOTE: For your convenience there is a link at the bottom of these instructions that you can use to open a print version page.
Materials
1 - 32" x 48" 1/2" plywood (floor)
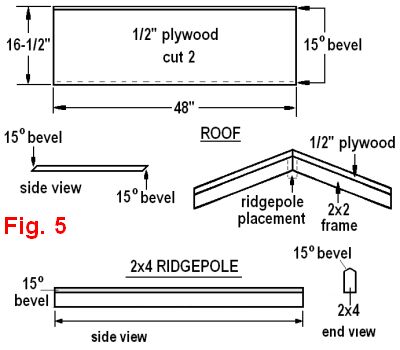
2 - 16-1/2" x 48" 1/2 plywood (roof)
2 - 13" x 45" 1/2" rigid foam (inside roof)
1 - 39-1/2" x 32" 7/16" masonite siding (front wall)
2 - 31-1/2" x 48" 7/16" masonite siding (sides)
1 - 37-1/2" x 32" 7/16" masonite siding (back wall)
1 - 18" 1/2" quarter round
32" 1-1/2" metal flashing
1 bundle 3-tab shingles
15# felt (enough to cover the roof - 11 square feet)
36" 2x6 (front wall caps and uprights)
49' 2x2 (framing)
47' 1x2 (trim)
2 - 35-1/2" 1x3
exterior paint
29-1/2" x 46-1/2" outdoor carpet (dog house floor)
16d box nails
6d galvanized nails (siding)
6d finishing nails (trim)
1" finishing nails (quarter round)
1" roof nails (to install shingles)
staple gun and 1/4" staples (to install roof felt)
non-toxic adhesive suitable for gluing rigid foam to plywood
exterior Carpenter's glue (optional)
Instructions
NOTE: Although it hasn't been included in the instructions, you can glue any and all lumber together with exterior glue
to give it added strength. Just make sure you dry fit the pieces before you permanently glue and nail them together.
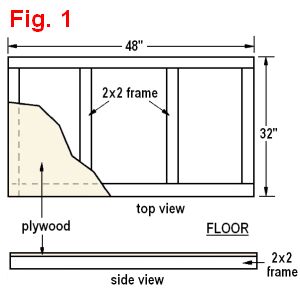
Cut and assemble the frame for the floor (Fig. 1). Attach the plywood to the frame.
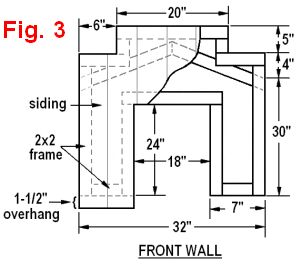
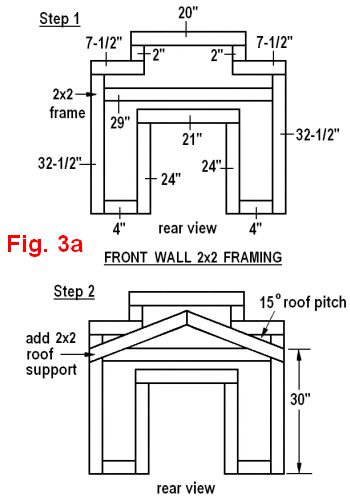
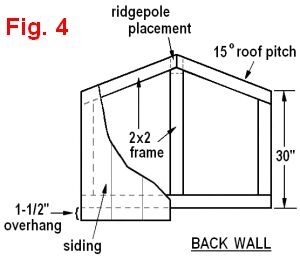
Cut and assemble the frame for the sides (Fig. 2), front wall (Figs. 3, 3a), and back wall (Fig. 4).
Attach the side, front, and back wall frames to the floor and to once another at each corner.
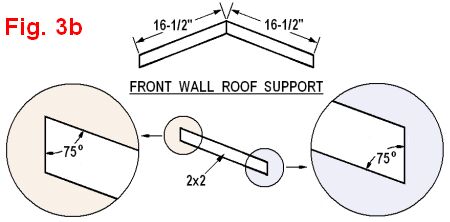
Position the ridgepole and secure in place by nailing from the outside, through the front and back wall frame, and then into the
ends of the ridgepole.
Next, install the rigid foam (which provides insulation and prevents roofing nails from penetrating the interior of the dog house).
Start by fitting the roof pieces onto the top of the wall framing.
From underneath, draw a line all the way around where the frame meets the roof plywood. This will give you the area where you
will fit and glue the rigid foam.
Lay the roof plywood flat with the inside facing up. Using a utility knife, trim the 2 rigid foam pieces to fit between the
lines you drew on each piece of plywood.
Glue the foam in place. Once the glue has set up, you can permanently nail the roof pieces in place.
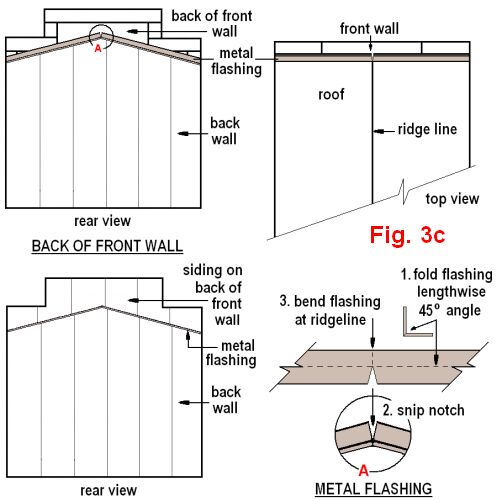
Install metal roof flashing where the roof meets the back of the front wall (Fig. 5).
Install siding on all four walls. Install siding on the back of the front wall so that it overlaps the metal flashing and fits
snug against the roof (Fig. 3c).
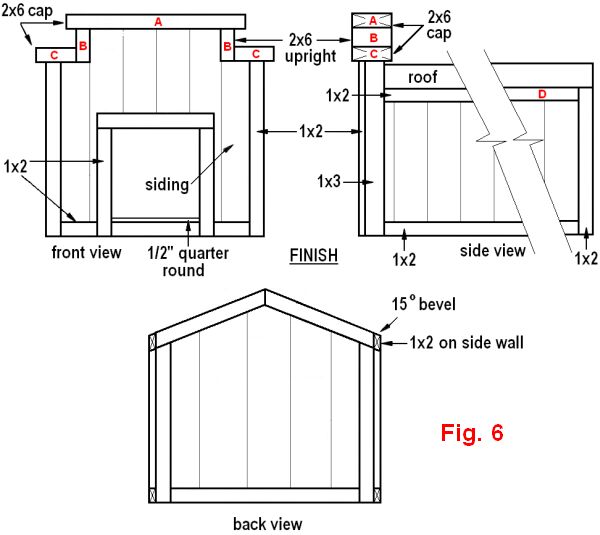
Install all the 1x2 and 1x3 trim pieces (Fig. 6). On the 1x2 top trim, "D", on both side walls, you'll need to put a 15 degree
bevel to match the roof pitch (see Fig. 6).
Install the 2x6 caps, "A", "B", and "C", on the front wall (Fig. 6).
Nail the 1/2" quarter round in the gap created by the front edge of the plywood floor and the trim across the bottom of the
door opening.
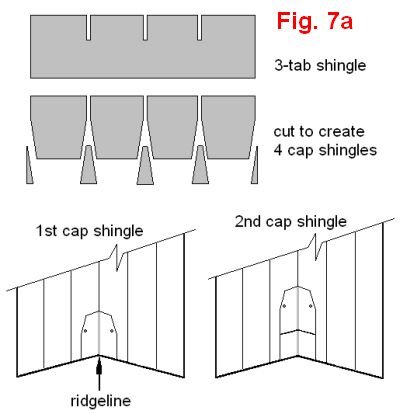
Working horizontally, staple felt onto the entire surface of the roof. Make certain you allow it to overlap the ridgeline
(don't trim it off flush at the top.
Referring to Fig. 7, install the shingles. (Use a chalk line to keep your rows straight.) To cap off the ridgeline, cut the
shingles and install them as shown in Fig. 7a.
Paint siding and trim.