Free Dog House Plans
A-Frame Style Dog House

A dog house built in the form of an A-frame is pretty much standard. Not much to them but a floor and two sides of a roof. What makes this one unique is the balcony, the kind you find in real A-frame houses. Just the right touch to make this design dog special!
NOTE: For your convenience there is a link at the bottom of these instructions that you can use to open a print version page.
Materials
1/2" plywood
1 - 24" x 24" (floor)
2 - 24" x 22-1/4" (roof)
1 - 6" x 14-1/2" (balcony deck)
2 - 24" 2x2 (floor)
2 - 21" 2x2 (floor)
4 - 21" 2x2 (roof)
1 - 24" 2x2 (blocking)
2 - 7" 2x2 (blocking)
1 - 24" 2x4 (ridgepole)
25" metal flashing (ridge cap)
7" 1/2" quarter round (door opening)
28" 1/2" half round (balcony deck edge finish)
7' 1/2" dowel (balcony railing)
7' 1x2 (door trim and balcony railing cap
2 1/2" metal corner brackets
1 bundle 3-tab shingles
15# roof felt (enough to cover roof - 8 square feet)
2 - 21" x 19-3/4" x 1/2" rigid foam (roof insulation)
21" x 21" outdoor carpet (floor)
8d nails (2x2 framing)
4d nails (nail plywood to frame)
1" roofing nails
1" finish nails (quarter and half round)
4 - 1-1/4" wood screws
2 - 1" wood screws
8 - 3/8" wood screws (metal brackets)
staple gun and 1/4" staples (to install roof felt)
wood putty
Carpenter's wood glue
non-toxic adhesive suitable for gluing rigid foam to plywood
paintable exterior caulking
liquid nail or silicone caulking (to adhere roof flashing)
exterior paint
Instructions
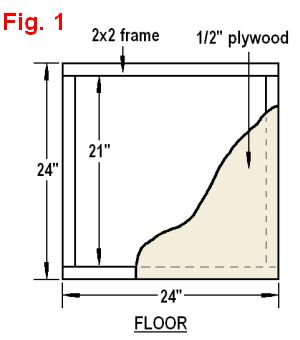
Referring to Fig. 1, cut and assemble the floor frame. Cut the plywood and attach it to the frame.
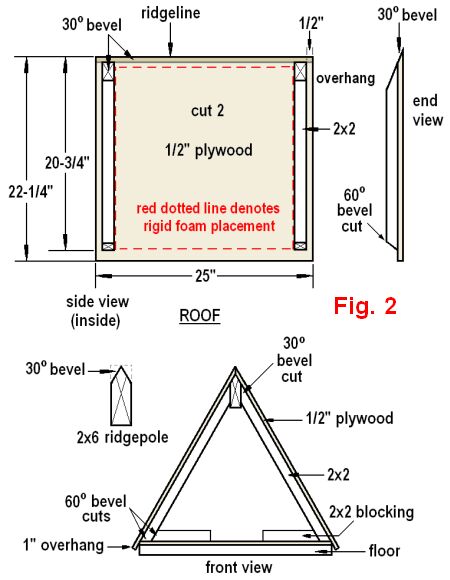
Referring to Fig. 2, cut and assemble the roof pieces. Note the 30 degree angle at the top edge of the plywood and 2x2's and the 60 degree angle at the bottom of the 2x2's.
Using the dotted red lines in Fig. 2 as a guide, glue 1/2" rigid foam to each roof piece.
Attach the roof pieces to the floor and to each other at the ridgeline. Note the 2x2 blocking that needs to be added on the floor both front and back.
Cut the plywood for the front and back walls. Add the 2x2 frame pieces around the door opening. Fitted properly onto the dog house, the edge of the roof plywood should be flush with the outside of the wall. Nail the walls in place both front and back.
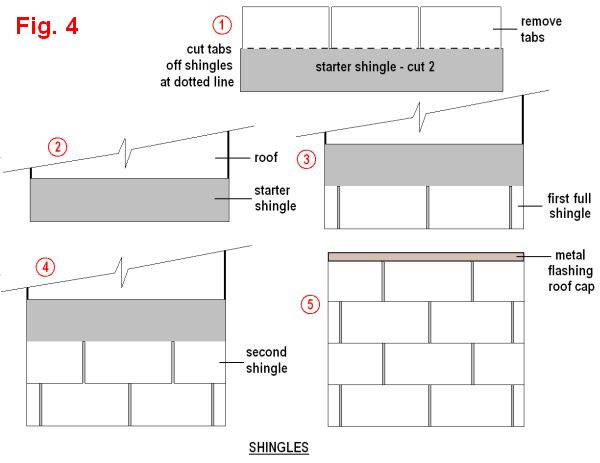
Cover the roof with felt, making certain you overlap the ridge of the roof (and not cut the felt off flush at the top).
Referring to Fig. 4, cut and install the shingles. At the ridgeline, fold the flashing in half lengthwise so it fits tight against the roof on both sides of the ridge. Once fitted properly, remove it and run silicone (or liquid nail) along the top on both sides. Press the ridge cap in place.
Now comes the fun part - the balcony...
Cut 2 pieces of 1x2 trim the height of the door opening. As shown in Fig. 5, center one of the metal corner brackets at the top of each 1x2 and trace around it. Using a utility knife and small chisel, remove enough wood to allow the bracket to sit flush with the surface of the 1x2.
Attach the brackets to the 1x2's with 3/8" screws and mount the 1x2's on either side of the door opening with finish nails.
Cut and assemble the front and side 1x2's of the railing cap. On a flat surface, glue the mitered corners together (if you have suitable clamps, use them).
After the glue has set up...
You can then drill pilot holes and secure the corners with finish nails, but you need to be careful that the nails don't interfere with drilling the dowel holes.
With the right side of the plywood facing down, place it over the top of the railing cap, so the outer edges of both pieces are flush. Mark center points for each of the 16 dowels (dowels should be spaced 1" apart). With a pilot drill bit, drill through the plywood and into the railing cap (just deep enough to "mark" the 1x2's.
Turn the plywood over, so the good side is facing up. Using each pilot hole as a guide, drill 1/2" holes 1/4" deep. Wood putty the pilot holes on the bottom side of the plywood. (NOTE: Be careful not to push the putty into the 1/2" part of the holes or the dowels won't fit.) When the wood putty is dry, sand smooth.
On the bottom of the railing cap, do the same thing. Where each hole is marked, drill a 1/2" hole 1/4" deep.
Mount the plywood deck centered over the metal brackets and secure from underneath with 3/8" screws.
Making sure the plywood deck is sitting level, measure and cut the 1x2 balcony supports, taking note of the proper angles at top and bottom (so the supports fit properly against the front wall at the bottom and the underside of the plywood deck).
Install the supports on either side of the door trim. At the bottom of each support, run pilot holes and screws through the support and into the door trim.
At the top, run pilot holes and screws down through the deck and into the top of the support.
Cut 16 5" long 1/2" wood dowels. Brush glue in each hole on the plywood and insert the dowels. Brush glue on the top of each of the dowels and carefully position the railing cap down and onto them. Once all the dowels are in place, push down on the cap to "seat" it.
If necessary, straighten the cap and dowels so that everything is plumb both vertically and horizontally.
Once the glue has set up, measure and cut parts "A" and "B". Secure them in place with silicone on the roof and Carpenter's glue at the mitered corner (where it meets the existing part of the railing cap).
After "A" and "B" are firmly in place (when the glue and silicone have sufficiently set up), you can drill pilot holes and use finish nails to secure the mitered corners.
Cut and install 1/2" half round on the exposed edge of the balcony deck. For a clean finished look, miter the corners of the half round.
To prevent leaks, caulk along the seam where the plywood deck meets the front wall.
Paint all exposed wood.
Optional: Use wood putty to finish off the exposed edge of the roof plywood prior to painting.