


Craft How To Instructions
Learn How To Embroider
Here you'll find the basic embroidery stitches as well as some you've probably never heard of. With all of them you'll be able to create any embroidery designs you like.
Back Stitch
Bring the thread through on the stitch line. Take a small backward stitch through the fabric. Bring the needle through again a little in front of the first stitch. Take another backward stitch, pushing the needle in at the point where it first came through.
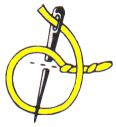
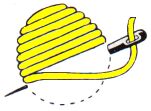
Bring the thread out on the lower line. Insert the needle in position on the upper line, taking a straight downward stitch with the thread under the needle point. Pull up the stitch to form a loop and repeat.
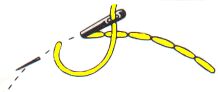
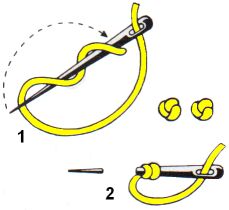
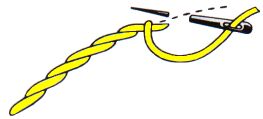
Coral Stitch
Bring the thread out at the right end of the line. Lay the thread along the line of the design and hold it down with your free thumb. Take a small stitch under the line and the thread and then pull through, bringing the needle over the lower thread as shown.
Cross Embroidery Stitch
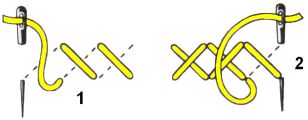
Bring the needle through on the lower right line of the cross and insert at the top of the same line, taking a stitch through the fabric to lower left line (1). Continue to the end of the row in this way. On the return, complete the other half of the cross (2). NOTE: It is important that the top strands of all the stitches point in the same direction.
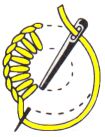
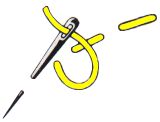
French Embroidery Knot
Bring the thread out at the required position. Hold the thread down with your free thumb and wind the thread twice around the needle (1). Still holding the thread firmly, twist the needle back to the starting point and insert it close to where the thread first emerged (see arrow). Pull thread through to the back and secure for a single French knot or pass on to the positon of the next stitch (2).
Holbein Embroidery Stitch

Work a row of this stitch from right to left similar to the running stitch, but with all stitches of lequal length. On the return, fill in space left free on row, then work next vertical stitch as shown.
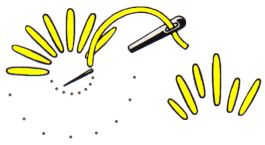
Romanian Embroidery Stitch
Bring the thread through at the top left of the shape. Carry the thread across and take a stitch on the right side of the shape with the thread below the needle (1). Take a stitch at left side, thread above the needle (2). These two movements are worked until the shape is filled in. Keep the stitches close together. The size of the center crossing stitch can be varied, either to make a longer slanted stitch or a small straight stitch.
Running Embroidery Stitch
Pass the needle over and under the fabric, making the upper stitches of equal length. Under stitches should also be of equal length, but half the size or less of the upper stitches.
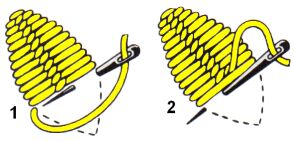
Satin Embroidery Stitch
Work straight stitches across the shape as shown. If desired, running stitch can be worked first to form a padding underneath to give a raised effect. Care must be taken to keep a good edge. Do not make the stitches too long as they could be pulled out of position.
Stem Embroidery Stitch
Work from left to right taking regular, slightly slanting stitches along the line of the design. The thread always emerges on the left side of the previous stitch. This stitch is used for flower stems, outlines, etc. It can also be used as a filling, rows of close stitches being worked throughout a shape until it is completed filled in.
Straight Embroidery Stitch
This is shown as single spaced stitches worked either in a regular or irregular manner. Sometimes the stitches are of varying sizes. Be careful not to make the stitches too long or too loose.