Free Craft Project
Milk Carton Semi Truck
Here's another fun craft that the kids will enjoy. This milk carton semi truck could start a whole slew of different ideas. Let the kids run with their imagination!
Materials
- 1 - quart size milk carton
- 2 - single serving milk cartons (smallest size, i.e. those used in school cafeterias)
- 15 popcicle sticks
- 5 toilet paper roll tubes
- plain brown wrapping paper
- glue
- scotch tape (optional)
- water or poster paints (your choice of colors)
- 2 pipe cleaners - 1 blue, 1 red (colors are optional)
Instructions
1. Clean all milk cartons thoroughly. Either push the top flaps (pointed part) inward or cut them off completely.
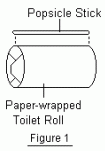 2. Wrap toilet rolls with plain brown paper, covering both ends as well. Secure with either glue or tape.
3. Glue a popsicle stick to each of the five toilet rolls (Figure 1). Paint all five of them (since these are the wheels and axles, black paint is suggested). Set aside to dry.
4. Cover all three milk cartons with brown paper (similar to the way you would gift wrap a package).
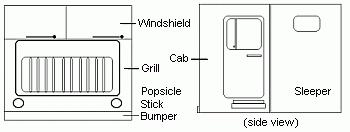
5. To create cab of truck: (This type of truck is known as a cabover, which means there is no protruding "nose" on the vehicle. The grill and windshield are flush with each other.)
Take the two smaller cartons and glue the top end of one to the top end of the other. Glue or tape them both together. Note: The bottom of the first carton will be the front of the truck/cab. The second carton becomes what is known as the "sleeper".
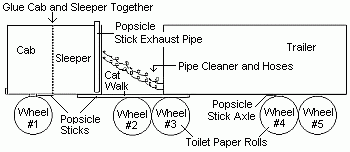
6. Starting at the outer back edge of the sleeper, glue popcicle sticks one next to the other all the way across, allowing about 1" of the sticks to attach to the sleeper itself (Figure 2). This creates what is called the "catwalk".
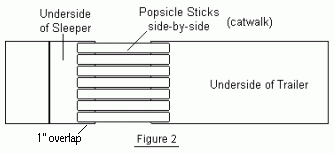
7. Now glue the trailer in place, overlapping approx. 1" of the opposite ends of the side-by-side popsicle sticks.
8. With attached cab/sleeper and trailer lying upside down, begin attaching each of the wheels (toilet paper rolls). Glue wheels #1 to the cab/sleeper, approx. 1" back from the front of the truck.
9. Glue wheels #2 and #3 on the catwalk so they are touching touching one another.
10. Glue wheel #4 approx. 3 inches in from the back end of the trailer.
11. Finally, glue wheel #5 directly behind and up against wheel #4.
12. Take another popcicle stick and glue it vertically on the side of the very back of sleeper for an exhaust pipe (stack). Repeat on the opposite side.
13. Glue a popcicle stick on the front of the cab/sleeper (for a bumper).
14. Coil pipe cleaners around pencil or finger and attach one end of each to the back of sleeper (about mid point) and the other end to trailer. These are the air lines.
15. Before painting the truck, you might want to pencil in some details, for instance, the windshield, grill, lights, side doors, etc.
Suggested colors for the grill and bumper are light grey or silver. Once the trailer is painted, a child's name can be added as well as a happy face or other form of "logo". It can even be decorated with stickers.
16. Optional: If you want, you can cut a slot in the top of the trailer, turning it into a coin bank!