Free Craft Project
Clay Slab Coil Pot
Such a fun craft project to do with the kids. They'll love being able to use their hands to create the clay "worms". Show them how to create a clay slab coil pot and then let them come up with their own ideas and see what happens!
Materials
- kneaded clay
- ruler (or straight edge)
- slip
- pencil
- butter knife
Instructions
Using several long clay worms, make six tightly coiled circles approx. 3" in diameter. Lay them side by side (Figure 1).

Make two worms and press them tightly against one outside edge of the coils. Make another worm and press it against the opposite outside edge (Figure 2).

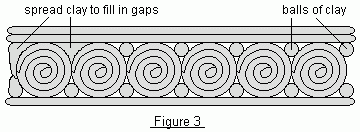
Take balls of clay and press them into all of the open spaces (Figure 3), spreading the clay so that it completely fills the gaps around each of the coils.

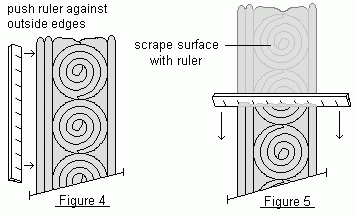
Using a ruler or straight edge in an upright position push firmly against both sides of the slab to make the outside edges nice and even (Figure 4).

Now take the ruler or straight edge and scrap across the entire surface (Figure 5). Finish smoothing with wet fingers. (The coil detail on the underside of the slab will remain.)
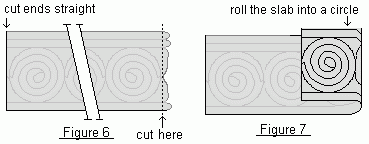
Cut both ends of the coil slab straight up and down as shown in Figure 6. Gently lift slab and put slip on both of the cut ends. Carefully roll sides until the edges come together. Now you should have a bottomless pot (Figure 7). On the inside of the pot, scrape and smooth the seam. You may want to use a bit of extra clay and then smooth it out with wet fingers.

Bottom:
 Make a tight coil circle, slightly larger than the pot itself (Figure 8). Scrape and smooth the surface. Now attach the pot to the bottom using slip. Scrape the inside seam downward to create a nice clean bond. If needed, fill in any gap with bits of clay and then smooth it with wet fingertips.
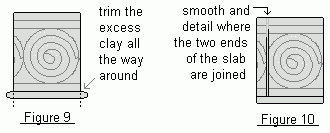
On the outside, carefully trim away any excess clay with a butter knife (Figure 9). Smooth all around the bottom (leaving the detail groove where the bottom meets the pot).

Smooth where the two ends of the coil slab are joined. Use a pencil to finish the detailed look of coils and horizontal grooves (Figure 10).
Allow to dry completely before painting


