


Free Craft Project
Willow Branch Chairs
These willow branch chairs are a real classic. Naturally, they take a good deal of time and energy to create but if you're into this kind of thing, this is the perfect craft project for you to tackle. Make them for yourself or make them to sell.
Tools
- hand saw
- pruning shears
- claw hammer
- carving knife
- tape measure
- suitable length galvanized nails
Gathering Willow
Naturally, if you're going to make willow furniture, you'll need willow branches. The best time to gather them is when their sap begins to flow (the same time leaf tips begin to appear).
In general, choose branches that are approximately 1-1/2" in diameter for parts like legs and the basic frame. For the arms of a chair as well as the headrest, 3/4" thick branches with as few side branches as possible work best. Finally, for the backrest, consider 1/2" switches.
Chair Design
Whatever size chair you build will involve these basic proportions: the rear legs and the two horizontal backrest supports will be twice the length of the front legs. Additionally, all rungs, braces, and crosspieces will be halfway between the length of the front and rear legs.
Since the diameter of the willow branches varies, you'll need several different lengths of nails as well. They need to be long enough to hold securely, but short enough that they don't come out the opposite side.
On average, a medium size chair frame will require the following pieces (see FIG's 1 and 2 for corresponding letters and numbers):
- 2 - 14" legs [2 a's]
- 4 - 28" pieces [2 b's, 6, 7]
- 11 - 21" members [2 c's, 2 d's, 1, 2, 3, 4, 5, 2 braces]
The Frame
 Once you have all the frame pieces cut to length, start by making the left and right halves of the chair separately.
On a flat surface, place one front leg [a] and one rear leg [b] not quite parallel to one another (FIG. 1). Now place two rungs [c and d] across the legs and then nail in place. Now repeat this procedure for the opposite side of the chair. Note: Make certain you create a mirror image of the first, and NOT a duplicate. Unless, of course, you're making several chairs at once. ;-)
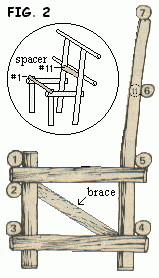 Stand both halves upright, side by side, approximately 18" apart. Referring to FIG. 2, connect the two with a cross member [# 1]. Now place two more cross members [# 2 and # 3], one just below the upper side rungs, and the other just above the bottom side rungs.
On the back, nail a cross piece on top of the bottom side rungs [# 4], and then another on top of the upper side rungs [# 5]. To complete the frame, nail a 28" long piece of stock [# 6] centered across the back, halfway up, and then an identical 28" piece centered on the very top of the uprights [# 7].
Nail a spacer [# 11} which fits snuggly between the uprights, directly in front of the # 6 piece (this provides the correct support and alignment for the seat willows). Finally, add two diagonal braces on both the left and right sides of the lower frame (see FIG. 2). This will be easier to do if you lay the frame on its side. Also, make certain the sides are square before nailing the braces to the frame.
The last step is to add extra nails where needed to stabilize all of the pieces. Once that's done, the arms and headrest can be added.
The Arms
The willows you'll be using for the arms should be four to five feet long and about as big around as a man's thumb. Make certain you clean all the side branches and buds, making the pieces as smooth as possible. To test whether or not a piece will hold up, grab each willow by both ends and then bend it into a sharp curve. You want the curve to be fairly uniform, with no weak or stiff spots.
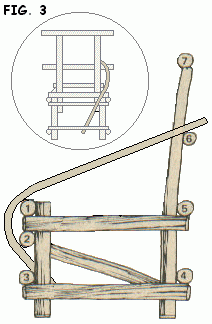 With the frame standing upright, and facing the front, tuck the larger end of the willow behind the middle of the chair's lowest rung. Now bend the willow back against the uppermost cross member [# 1] so that it lands approximately four inches in from the end. Then bring the small end of the bowed willow down against the 28" piece that's halfway up the back [# 6].
Once the willow is bent in a way that looks most appealing, you can nail it in place on the frame and cross members.
Now add a second willow to the outside of the first and then nail one to the other every few inches. It's best to nail this second willow from the inside out. That way, if any nails happen to protrude, the next willow will cover up the tips of the nails.
Continue in this manner until you have completed the width of the arm. Generally, for a medium size chair, you will use five or six pieces. Now repeat the entire procedure on the opposite side.
Headrest
For this, you'll be using willows similar to those you used on the arms, but having a length of eight to nine feet.
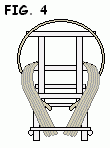 Start by bending a willow into a circle around the arms of the chair and then tucking the ends down inside the upper side rungs of the seat frame (FIG. 4). Pull down on the ends of this willow until the curve of the headrest is flush with the horns (ends) of the top crosspiece [# 7] on the back.
Once you've nailed this willow to the frame, take a slightly longer willow and place it next to the first. Note: As you're placing each consecutive willow, keep in mind that you want the headrest to slant slightly forward along the curve at the top.
Nail this second willow to the outside of each arm, the inside of the seat frame, and every six inches or so to the first headrest willow. Repeat the entire procedure with three more willows, each one slightly longer than the previous willow.
The Seat
The willows you use for the seat will be 1/2" in diameter and approximately three feet long.
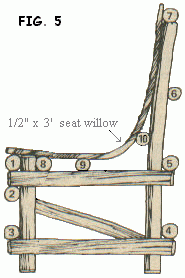 Before you begin placing the willows on the seat frame, you need to put three more cross members in place. Start by nailing number 8 and number 9 (FIG. 5) across the seat frame.
In order to determine the correct height for the third cross member [# 10], you need to first bend (or dry fit) one of the seat willows in place. Position the third cross member beneath the bend and up against the back uprights. Mark the location and then nail the cross member to the frame.
Now all you need to do is place the seat willows. They each run from the front of the seat to the back, and then up under the headrest. Space them no more than one inch apart, nailing them to the frame and cross members as you go.